How to install a reverse osmosis system: a DIY how-to guide
Yes, you can install most under-sink reverse osmosis systems yourself.
If you can shut off a valve, tighten a fitting, and drill one hole, the job is within reach for a confident DIYer.
Plan on 2 to 4 hours your first time, or about 1 to 3 hours for a plumber who does it weekly. (This Old House)
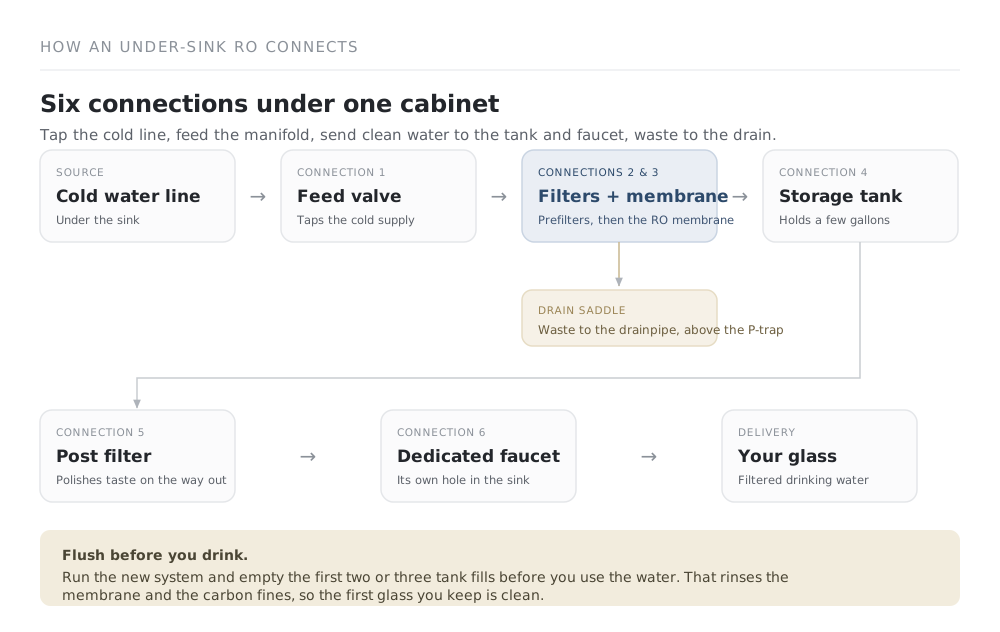
The plumbing is simple once the order is clear: mount the unit, tap the cold water line with the feed valve, set the faucet, clamp on the drain saddle, connect the color-coded tubing, then flush the system before you drink.
Call a pro instead if you’d have to drill a granite or quartz countertop for the faucet, add a new water line, or fix low water pressure first.
This guide walks the whole install, the tools and parts, the pressure and code checks that trip people up, and the real cost of doing it yourself versus hiring out.
Can you install a reverse osmosis system yourself?
For a standard under-sink system, yes.
A reverse osmosis system connects to the cold water line under your sink, so the skill you need is basic plumbing, not anything specialized to water treatment.
The unit comes as a pre-assembled manifold with color-coded tubing and push-in fittings, so most connections are hand-tight with no soldering. (SpringWell)
You’re a good candidate for the DIY route if three things are true:
- Your cold water shutoff under the sink is easy to reach and in working order.
- You have a spare hole in the sink or countertop for the faucet, or a sink deck you can drill.
- Your water pressure is in the normal range, which the next section shows you how to check.
Hire a plumber if the faucet has to go through a solid granite or quartz countertop, your feed pressure is too low, or you’d need a new cold water line or drain to make it work.
Those jobs are still doable, but they add the exact cost and risk that erase the savings of going it alone.
Check your water pressure before you buy
This is the one check that decides whether a standard reverse osmosis system will even work.
A reverse osmosis membrane needs water pressure to push against, so most systems want 50 to 80 psi at the tap.
Below about 40 to 45 psi, the system makes water slowly and the tank never quite fills, so you’ll want a permeate or booster pump added to the setup.
Above 80 psi, high pressure stresses the fittings and the tank, so add a pressure-reducing valve ahead of the system.
A $10 gauge that screws onto an outdoor spigot or laundry tap reads your pressure in seconds.
If you’re on a private well with a pressure tank, your pressure swings between the pump’s cut-in and cut-out settings, so check it at the low end of that range.
Tools and parts you need
The parts list is short, and your reverse osmosis system supplies almost all of it.
Parts:
- The reverse osmosis system, which includes the filter-and-membrane manifold, storage tank, dedicated faucet, drain saddle, and tubing.
- The feed water adapter valve that taps your cold supply line, usually included with the kit.
- Extra tubing only if the run to the faucet or tank is longer than the kit provides.
- Plumber’s tape (PTFE) for any threaded connection.
Tools:
- A drill with a 1/4-inch bit for the drain saddle, and a 1/2-inch or larger bit if you need a new faucet hole in a stainless or laminate sink.
- An adjustable wrench and a pair of pliers.
- A bucket and towels for the water left in the supply line.
- A pressure gauge to run the check above.
A ceramic, granite, or quartz sink or countertop needs a diamond hole saw and a careful hand, which is the point where many DIYers hand the faucet step to a pro.
How to install a reverse osmosis system, step by step
Work in this order, because each step sets up the next.
1. Mount the unit and shut off the cold water
Set the filter manifold on the cabinet wall or floor where you can still reach the filter housings to change them later.
Close the cold water shutoff under the sink, then open the existing faucet to release the pressure in the line. (SpringWell)
Keep the bucket handy for the water that drains out when you disconnect the line.
2. Install the feed water valve on the cold line
Disconnect the cold water supply line from the faucet’s shutoff, fit the reverse osmosis feed water adapter valve in line, and reconnect the supply. (SpringWell)
This valve is where the system draws its water, and it lets you shut the reverse osmosis off on its own without cutting water to the rest of the sink.
Wrap any threaded joint with plumber’s tape and snug it firmly, but don’t crank plastic fittings hard enough to crack them.
3. Install the dedicated faucet
Reverse osmosis water comes out of its own small faucet, so it needs a hole in the sink or countertop.
Use an existing soap-dispenser or sprayer hole if you have one, or drill a 1/2-inch to 1-1/4-inch hole to match your faucet’s base. (SpringWell)
Drop the faucet through the hole, tighten it from below, and leave the tubing tail loose for now.
Stainless and laminate drill easily; a stone or composite countertop needs a diamond bit and patience, or a plumber.
4. Clamp on the drain saddle
The system sends a little waste water to the drain, and the drain saddle is the clamp that connects it.
Mount it on a vertical or horizontal section of the drainpipe above the P-trap, and keep it before the garbage disposal, not after it.
Don’t put it on the bottom of a horizontal pipe, where debris can collect and clog the port.
Drill the marked spot with a 1/4-inch bit through one wall of the pipe, line the saddle’s port up with the hole, and tighten the clamp evenly.
5. Mount the storage tank and connect its valve
Stand the tank near the manifold, upright or on its side per the manual, so the faucet has an easy run to it.
Wrap the tank valve threads with plumber’s tape and hand-tighten the tank connector onto it.
Leave the tank valve open once the system is running, since it’s the stored pressure that gives you a fast stream at the faucet.
6. Connect the color-coded tubing
Match each tube to its port by color, following the diagram in your manual.
A typical run is: the feed valve to the manifold inlet, the manifold to the tank, the manifold’s waste line to the drain saddle, and the final post filter to the faucet. (SpringWell)
Push each tube fully into its quick-connect fitting until it seats, then tug it gently to confirm it’s locked.
A tube that isn’t pushed all the way in is the most common source of a slow under-sink leak, so check each one twice.
7. Turn on the water and flush before you drink
Open the cold water shutoff and the feed valve slowly, then watch every fitting for leaks for a few minutes.
Let the system fill the tank once, then open the reverse osmosis faucet and empty the whole tank to flush the membrane and the carbon fines. (SpringWell)
Repeat that fill-and-empty cycle two or three times before you keep any water, because the first water carries the membrane’s preservative and loose carbon dust.
After the flush, the water is ready, and a full tank takes a couple of hours to build back up.
Air-gap or non-air-gap faucet?
Your reverse osmosis faucet is one of two types, and it changes the drain hookup.
An air-gap faucet builds in a physical break so drain water can never siphon back into the system, and it has three tubes running to its base instead of one.
A non-air-gap faucet is simpler, with a single tube, and it runs quieter because it skips the small gurgle an air-gap faucet makes as it drains.
Here’s the deciding factor: some plumbing codes, including California’s, require an air-gap faucet on a reverse osmosis system, so check your local code before you choose.
Where a non-air-gap faucet is allowed, many codes ask for a drain line check valve instead to guard against backflow.
Most kits ship with one type; if yours is air-gap and your code doesn’t require it, a quieter non-air-gap faucet is a common and inexpensive swap.
DIY vs pro: what it really costs
The system itself costs the same either way, so the choice comes down to labor.
A plumber charges roughly $200 to $500 to install an under-sink reverse osmosis system you supply, when the plumbing is straightforward. (Angi)
That figure climbs toward $500 to $900 if the job needs a new water line or a hole drilled through a stone countertop. (Angi)
Here’s the math on a typical install so you can weigh it for your own kitchen.
Worked example: a mid-range under-sink reverse osmosis install
- Reverse osmosis system (same either way): $250
- DIY extra parts: plumber’s tape and a spare length of tubing = ~$15
- Optional pressure gauge, if you don’t own one: ~$12
DIY total: about $275, plus 2 to 4 hours of your time. Pro total: about $500 to $750 (the $250 system + ~$250 to $500 labor).
You save roughly $250 to $500 by installing it yourself, and the tie-in is low-pressure and forgiving, so a mistake usually means a drip you can fix, not a flood. The savings hold as long as you don’t have to drill stone or add a new line, which is exactly when the pro quote climbs.
Across all setups, a professionally installed reverse osmosis system typically runs $300 to $700, and more for whole-house or complex plumbing. (Angi)
If you’re still choosing the system, compare picks and certifications on the best under-sink reverse osmosis systems first, since the model you pick changes both the price and how easy the tie-in is.
Common installation mistakes
Most failed DIY installs trace back to a short list of avoidable errors.
- Skipping the pressure check, so the tank never fills and the system seems broken when it just needs a booster pump.
- Not seating the tubing fully in a quick-connect fitting, the most common cause of a slow under-sink leak.
- Putting the drain saddle after the disposal or on the bottom of a horizontal pipe, where it clogs.
- Drinking the first tank instead of flushing the preservative and carbon fines out first.
- Cranking plastic fittings hard enough to crack the housing or the tank valve.
- Closing the tank valve and then wondering why the faucet only trickles.
None of these takes special skill to avoid, just a slow pass and a check of each fitting before you walk away.
Frequently asked questions
How long does it take to install a reverse osmosis system?
Plan on 2 to 4 hours for a first-time DIY under-sink install, and about 1 to 3 hours for a plumber.
Most of that time is the drain saddle and the faucet; the tubing connections and startup take only a few minutes.
Do I need a plumber to install a reverse osmosis system?
No, not for a standard under-sink install where the cold shutoff, a faucet hole, and normal water pressure are all in place.
Hire one if you’d have to drill a stone countertop, add a new water line, or correct low pressure first.
What water pressure does a reverse osmosis system need?
Most systems want 50 to 80 psi.
Below about 40 psi you’ll need a booster pump, and above 80 psi you’ll need a pressure-reducing valve to protect the fittings and tank.
Where does the reverse osmosis drain line connect?
To a drain saddle clamped on the drainpipe above the P-trap and before the garbage disposal.
Keep it off the bottom of a horizontal pipe so debris can’t collect at the port.
Do I need an air-gap faucet for reverse osmosis?
It depends on your local plumbing code; some areas, including California, require one.
Where a non-air-gap faucet is allowed, a drain line check valve is the common alternative for backflow protection.
Is the first water from a new reverse osmosis system safe to drink?
Not the first tank or two.
Run the system and empty the first two or three tank fills to flush the membrane’s preservative and the carbon fines before you keep any water.
Choosing the system itself? Compare picks and NSF certifications on the best under-sink reverse osmosis systems.
Not sure reverse osmosis is even the right tool? Start with how to choose a reverse osmosis system.
Wondering about a whole-house version? Read do you actually need whole-house reverse osmosis? first.
How we researched this
We built this guide from manufacturer and treatment-specialist install manuals (SpringWell, Fresh Water Systems, ESP Water Products), cross-checked the pressure and drain-saddle guidance against those sources, and priced the job against current installed-cost data (This Old House, Angi).
We don’t install these systems in-house yet, so we don’t claim to; the steps, pressures, and clearances here follow the documents above, and you should always follow your own unit’s manual and local plumbing code.
When we point to a system to buy, it’s the picks compared in depth on the pages this guide links to, and we may earn a commission if you buy through those links, at no cost to you.