Water softener installation: the DIY-vs-pro how-to guide
Yes, you can install most water softeners yourself.
If you can shut off your water, cut a pipe, and tighten a fitting, the job is within reach for a confident DIYer.
Plan on a half-day: about 4 to 8 hours your first time, or 2 to 4 hours for a plumber who does it weekly.
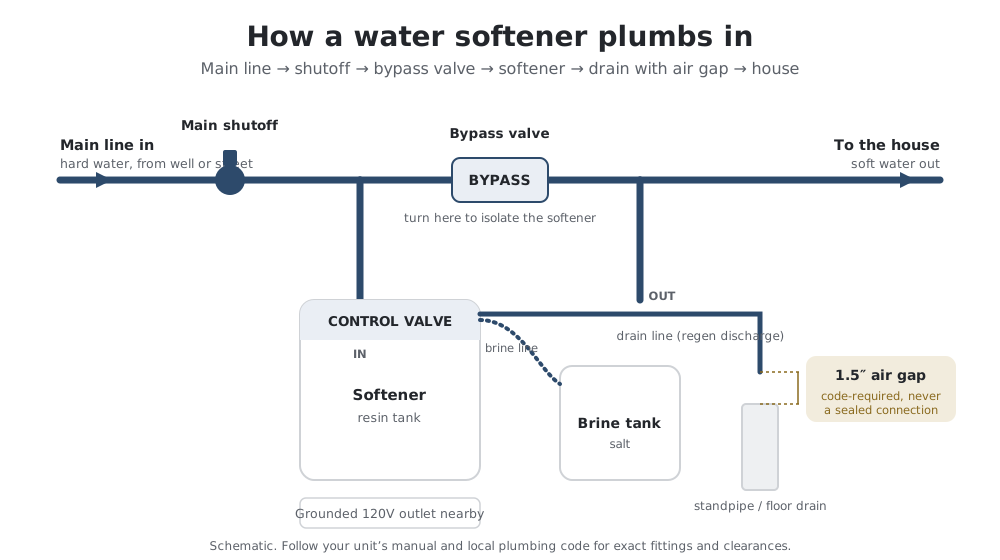
The plumbing itself is simple once the order is clear: shut off and drain, cut in a bypass valve, connect the in and out lines, run a drain line with an air gap, hook up the brine line, then start the unit up slowly.
Call a pro instead if the tie-in means soldering copper you’re not sure of, moving the main line, or adding a drain or a power outlet you don’t already have close by.
This guide walks the whole install, the tools and parts, the code rules that trip people up, and the real cost math for doing it yourself versus hiring out.
Can you install a water softener yourself?
For most homes, yes.
A softener taps into your main water line, so the skill you need is basic plumbing, not anything specialized to water treatment.
The unit comes with its own bypass valve and control head, and the drain and brine connections are low-pressure and forgiving.
You are a good candidate for the DIY route if three things are true:
- Your main line is easy to reach, with room to work near where water enters the house.
- A floor drain, standpipe, or utility sink sits within a few feet for the drain line.
- A grounded 120V outlet is close enough to reach without an extension cord.
Hire a plumber if your pipe is old galvanized steel, the tie-in needs soldered copper joints, or you’d have to run new drain or electrical to make it work.
Those jobs are still doable, but they add the exact risk and cost that erase the savings of going it alone.
Where the softener goes
Get the location right before you touch a wrench.
Put the softener where water first enters the house, upstream of the water heater, so it treats both hot and cold. (Minnesota Department of Health)
Keep any outdoor spigots for the garden on the hard-water side, ahead of the softener, so you’re not softening water for the lawn.
Leave at least 18 inches of clearance around the unit for salt fills and service.
And keep three things within reach of that spot: the main line, a drain, and power.
That last point is where most installs get complicated, so measure the distance to your nearest drain before you buy anything.
Tools and parts you need
The parts list is short, and your softener supplies the biggest piece.
Parts:
- The softener, which includes the control valve, resin tank, brine tank, and bypass valve.
- Two flexible connectors to join the unit to your main line. Push-to-connect braided ones fit copper, PEX, or CPVC with no soldering. (Culligan)
- Drain tubing, usually 1/2-inch, plus a clamp to hold it at the drain.
- Fittings and shutoff valves to match your pipe, and PTFE (Teflon) tape for threaded joints.
- Bag salt to charge the brine tank after start-up.
Tools:
- A pipe cutter sized to your line.
- Two adjustable wrenches or channel-lock pliers.
- A bucket and towels for the water left in the pipes.
- A drill and drain saddle only if you’re tapping an existing drain pipe rather than a standpipe.
If your home is plumbed in copper and you’d rather not solder, push-to-connect fittings let you do the whole tie-in with a pipe cutter and your hands.
How to install a water softener, step by step
Work in this order and each step sets up the next.
1. Shut off the water and drain the lines
Close the main shutoff valve.
Open the lowest faucet in the house, and an upstairs one, to drain the pressure and most of the water out of the pipes.
Switch off the water heater so it doesn’t run dry while the supply is off.
2. Cut in and mount the bypass valve
Cut the main line where the softener will tie in, and keep the bucket handy for the last of the water.
Attach the bypass valve to the control head first, then plumb your inlet and outlet to it. (Crystal Quest)
The bypass valve lets you shut water off to the softener alone and keep water running to the house during service, so mount it where you can reach the handle.
3. Connect the in and out lines
Connect the hard-water feed to the inlet marked IN, and the softened line back to the house to the outlet marked OUT.
Getting these backward is the most common install error, and reverse flow can push resin beads out of the tank and into your faucets. (Crystal Quest)
Most control valves stamp the direction right on the housing, so check the arrows before you tighten.
Wrap threaded joints with Teflon tape, and hand-tighten plastic fittings so you don’t crack them.
4. Run the drain line with an air gap
Run the 1/2-inch drain tubing from the control valve to your floor drain, standpipe, or utility sink.
Leave a 1.5-inch air gap between the end of the tube and the drain opening, and never seal the tube into the drain pipe. (Minnesota Department of Health)
That gap keeps drain water from siphoning back into the softener, which is why plumbing codes require it.
Keep the run short and sloped, with no kinks, so regeneration water drains freely.
5. Connect the brine line and add salt
Connect the smaller brine line from the control valve to the brine tank, following the unit’s diagram.
Seat its fittings firmly, since a loose brine line leaks air and throws off the salt draw.
Add water and salt to the brine tank only after the first start-up, per your manual.
6. Start up slowly and flush the resin
Open the bypass valve slowly, a quarter of the way, with a nearby faucet open.
Easing pressure in flushes air and loose resin fines out gradually instead of slamming the tank. (SpringWell)
Let the water run until it’s clear, then open the bypass the rest of the way and check every joint for leaks.
Plug in the control valve and confirm it powers up.
7. Program the control valve and run a regeneration
Set the time of day, your water hardness in grains per gallon, and the regeneration schedule the manual recommends.
Run a manual regeneration once to prime the system and confirm the drain flows and the brine draws.
Not sure of your hardness number? A water hardness test kit gives you the figure the valve needs, and it’s the same number that sizes the unit.
DIY vs pro: what it really costs
The softener itself costs the same either way, so the choice comes down to labor.
A plumber charges roughly $300 to $1,000 to install a softener you supply, and doing it yourself saves that whole amount.
Here’s the math on a typical install so you can weigh it for your own home.
Worked example: a mid-range softener install
- Softener unit (same either way): $800
- DIY extra parts: two flex connectors (
$25 each), drain tubing and clamp ($15), fittings and tape ($25) = **$90**- Permit, where required: $50 to $150
DIY total: about $890 in parts, plus 4 to 8 hours of your time. Pro total: about $1,300 to $1,400 (the $800 unit + ~$500 labor + a ~$100 permit).
You save roughly $500 by installing it yourself, close to the middle of the $300 to $1,000 labor range. That’s real money for a half-day of work. The catch: a mistake on the main line can flood a basement and cost more than the labor you saved, so the savings only hold if the tie-in is one you’re confident doing.
An installed softener, parts and labor together, typically lands between about $1,200 and $3,800 depending on the unit and your plumbing. (HomeGuide)
If you’re still choosing the unit, compare picks and sizing on the best water softeners first, since the model you pick changes both the price and how easy the tie-in is.
Permits and plumbing code
Check your local rules before you start, because a softener install is often a permitted job.
Many building departments require a plumbing permit for a softener, usually $50 to $150, and some inspect the finished work.
Two code points come up almost everywhere:
- The drain needs an air gap. Codes require the discharge to drain through an air gap, not a sealed line, to stop backflow into your water. (Minnesota Department of Health)
- Discharge usually goes to the sanitary sewer. Some areas restrict where the salty regeneration water can go, so check before you route the drain outside or to a septic system.
Pulling the permit also protects your softener’s warranty, since a few manufacturers require professional or permitted installation to honor it.
When in doubt, a five-minute call to your local building department settles the rules for your address.
Common installation mistakes
Most failed DIY installs trace back to a short list of avoidable errors.
- Reversing the in and out lines, which sends untreated water to the house and can flush resin into your pipes.
- Sealing the drain line into the pipe with no air gap, the code violation inspectors flag most.
- Skipping a sediment pre-filter on well water, so grit reaches the resin and clogs it early.
- Over-tightening plastic fittings, which cracks the bypass valve or control head.
- Soldering with the bypass valve attached, since the heat warps its plastic and o-rings.
- Opening the water full-blast at start-up, which slams the resin bed instead of easing pressure in.
None of these takes special skill to avoid, just a slow pass and a check of the arrows before you tighten.
Once the unit is running, keep it that way with the routine in our water softener maintenance guide.
Frequently asked questions
How long does it take to install a water softener?
Plan on 4 to 8 hours for a first-time DIY install, and about 2 to 4 hours for a plumber.
Most of that time is the tie-in and the drain line; programming and start-up take only a few minutes.
Do I need a plumber to install a water softener?
No, not for a standard install where the main line, a drain, and power are all within reach.
Hire one if the job needs soldered copper, a moved main line, or new drain or electrical, or if a permit or warranty requires professional work.
Where should a water softener be installed?
Put it where water enters the house, before the water heater, with 18 inches of clearance and a drain and outlet nearby.
Keep outdoor spigots on the hard-water side so you’re not softening water for the lawn.
Does a water softener drain need an air gap?
Yes.
Leave about 1.5 inches between the drain tube and the drain opening, and never seal the tube into the pipe, so waste water can’t siphon back into the softener. Most plumbing codes require it.
Can I install a water softener without soldering?
Yes.
Push-to-connect braided connectors join copper, PEX, or CPVC with just a pipe cutter, so you can do the whole tie-in without a torch.
Do I need a permit to install a water softener?
Often, yes.
Many areas require a plumbing permit and may inspect the work, so check with your local building department before you start.
Want the full how-it-works, sizing, and cost picture? Start with the water softener system guide.
Still choosing a unit? Compare picks on the best water softeners.
Need your hardness number to program the valve? Get it with a water hardness test kit.
Already installed? Keep it running with water softener maintenance.
How we researched this
We built this guide from manufacturer install manuals and treatment-specialist how-tos (Culligan, Crystal Quest, SpringWell), cross-checked against plumbing-code and public-health guidance on drain air gaps and discharge (Minnesota Department of Health), and priced against current installed-cost data (SoftPro, HomeGuide).
We don’t install these systems in-house yet, so we don’t claim to; the steps and clearances here follow the documents above, and you should always follow your own unit’s manual and local code.
When we point to a softener to buy, it is the picks compared in depth on the pages this guide links to, and we may earn a commission if you buy through those links, at no cost to you.